
The following guide is created by an experienced lash extension artist and trainer, Kätlin Liaks.
Hey, fellow lash techs!
I am very happy to see you here. My name is Kätlin, and today I’ll teach you how to create wispy lash extensions with a cat eye effect. Read this article to the end, as there are some really cool bonuses waiting for you! But first, let’s get to know each other a bit.
About me
I’ve been a lash tech for almost 4 years, and I’ve significantly perfected my craftsmanship during this time. I love creating art and making people feel good, lash extensions is the way I can express myself and evolve every day. I have participated in many worldwide competitions and brought home over 20 winning cups.
Constantly trying to be better is the way you will learn the most, and that’s why you are here today. But enough about me – I know you're here to master the wispy lash effect, so let’s get to it.
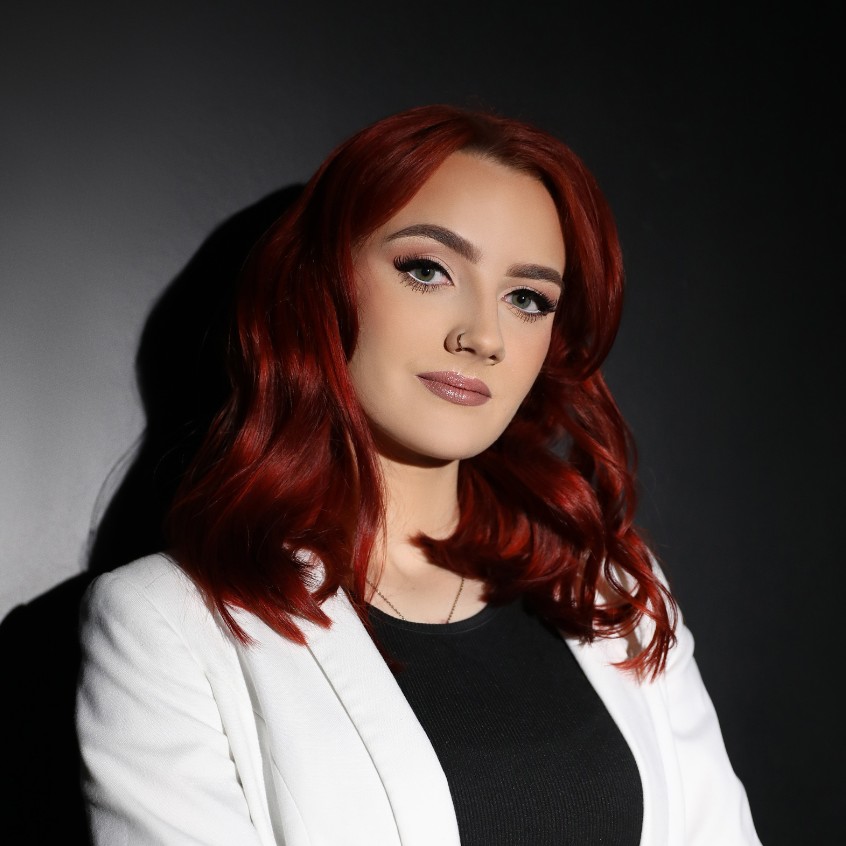
Starry Lashes asked their Instagram followers which wispy set they preferred to learn about the most. Based on the survey results, I'll teach you how to create this gorgeous wispy cat eye:

This beautiful lash set took me about 2.5 hours to complete and is totally customizable to different eye shapes.
Today, I’ll guide you through creating this specific set.
If you want to learn more about how I create all my wispy and special effects, follow me on Instagram @katlin.liaks – something very special is coming soon.
Stay tuned, and let’s dive into the world of wispy lashes together!
What colors and curls to use for a wispy set
First of all, let’s talk about colors. What color of lashes do you need to make this set?
You can use black, brown or dark brown lashes. However, I recommend using different shades of brown for clients with lighter skin and hair. Brown lashes are especially good for redheads, so keep that in mind.
You can always use black lashes, but brown lashes are very popular nowadays and should definitely be part of your collection.
Fun fact: about 40% of my clients prefer brown lashes over black ones.
In this set, I used brown lashes because the model had lighter skin and hair, making brown lashes a perfect fit for her.

Now, let’s talk about lash curls. Can you guess which curls I used for this set?
I recommend mixing curls to really bring out the effect while ensuring all the spikes are visible. Curl mixing isn't difficult, but you need to know some basic rules.
One of the most basic rules is that the softer curl should always be on the bottom row of the lashes. More curled lashes are for the spikes and should go on the top or middle layer.
The second basic rule is that different curls serve different functions, but this topic is for another time. There is so much to discuss about curls, their functions, and how the right choice can make or break a lash set. Today, I'll share which curls I used for this set of wispy lashes.
C+CC is the right answer!
This is one of my favorite curl mixing combos! I use softer curls like C on the bottom to give depth and stronger curls like CC on the top for the spikes.
Now that we’ve covered the basics, let’s get into the details.
Choosing the right mapping for clients
There isn’t one mapping that suits everyone, which is why you need to know how to create personalized mappings for each individual client.
Finding the right mapping can be challenging if you don’t know which factors to consider. This is one of the biggest topics in lash extensions and teaching it can take hours.
However, let’s focus on the cat eye effect (similar to the fox effect), which is one of the most loved and requested effects.
Here’s what you need to know about this effect:
First of all, I do not recommend doing a cat eye on a person with very heavy or droopy eyelids. With droopy eyelids, we need to cover the “droopy part,” and the cat eye effect will not achieve that. In fact, it might even make the droopy part more visible. Instead, I recommend doing a doll or squirrel effect (squirrel if it covers the droopy eyelid).
I also do not recommend a cat eye effect for a person with very downturned outer corners. This will make them appear even more downturned. Instead, you need to visually lift them, so I recommend a squirrel effect, which has a lifting effect.
There are ways to achieve a good-looking cat eye effect on a person with droopy eyelids or downturned outer corners, but I will share these techniques in my next course (follow me on Instagram @katlin.liaks to stay updated).
The cat eye effect suits people with almond or round eye shapes the best. This effect has an elongating function and can also lower the appearance of the outer corners.

How to get the perfect mapping
I like to do the mapping on the open eye with a white pen.
The first thing I mark on the eyelid is the starting point. Then I mark the ending point, and finally, the middle point, which I find by dividing the distance between the starting and ending points in half.

When creating a mapping you need to consider many factors, but let’s focus on this particular client.
She had lashes that grew downward on the outer corners, so I needed to use stronger curls on these lashes, as curls seem softer on downward-growing lashes (for example, CC appears as C). Therefore, I marked the point on the eyelid where I needed to switch from a softer curl to a stronger curl.
For clients with hooded eyelids, I also like to mark that switching point on the eyelid. This ensures that my mapping will cover the hooded part effectively.
After mapping out the scheme on the eyelids, I also draw the mapping on the gel pads to see the mapping more clearly.
I always use a light coloured pencil because it helps distinguish the natural lashes from the gel pad mapping.

I leave all mappings on the skin, so when I move the eye with tapes, the mapping stays in place, allowing me to follow my “original” placement zones.
I especially use this method when doing perfect Russian volume or special effects like liner.
After marking the inner, outer, and middle points, you can let the client close her eyes, as the next part doesn’t need to be done with the eyes open.
The schemes I drew are on the open eye, but you can easily do it on closed eyes as well.
Let’s start with the lashing process. I will guide you step-by-step on how to achieve this perfect look. There are 3 steps to get this look just right.
Step 1: Adding volume
Mapping:
Divide both parts into 3 equal sections and mark the lengths as shown in the picture below: 6-7-8-8-9-10 mm. You can divide the 6 mm section into 2 separate sections and add 5 mm to the inner corner as well.

This mapping is for the volume base. I used 4-6D fans because this client had fewer lashes in the inner corner, and I had to balance the volume by using different volume fans in some parts of the eye.
Use C curl and 4-6D lash fans.
Apply lashes on the bottom and middle layers. Use a two-layer modeling technique to get smooth transitions.

This is what I call the “base,” and it will provide the darkness and volume to the look.
Make sure that the lash fans you use are perfect and ALWAYS apply them at a 90-degree angle from the eyelid. The direction of the lashes is everything!
Your lash fans should look like this:

With perfect geometry, not too wide or too narrow.
Keep in mind that this gives the darkness and too-wide fans won’t achieve it. They will just make the overall look too uneven. We want messy wispy lashes, but we want them purposefully “messy” and not poorly made messy.
If you don’t yet have the skills to make perfect fans like this, then you need to practice and practice some more. To reach the top level, you can’t have unattractive-looking fans. If you have any questions about lash fans, feel free to send me a DM on Instagram @katlin.liaks.
Step 2: Adding main spikes
Mapping:
This step is easy, and you don’t need to draw it out on the eye patch. Just follow the base mapping you already have on the patch and add 2 mm longer spikes from the base, except in the outer corner where you will add 3 mm longer spikes than the base.

Apply the spikes on the top layer, placing 2-3 spikes in each section.
Spikes should be 3-5D and closed all the way. We will add softer spikes in the next step.
Use CC curl to get more definition and distinction.
So in conclusion: 2-3 mm longer, 3-5D, CC curl, closed spikes on the top layer.
This is what the spikes should look like:

Fully closed and at least 3D in volume.
I will emphasize this again… watch the directions! Any mistakes with the spikes will be immediately noticeable, so make sure all spikes are at a 90-degree angle from the eyelid. If a natural lash isn’t growing in the perfect direction from the lid, you must glue the extension at a 90-degree angle from the lid regardless. This is one of the most important rules!
Spikes should always be on the same row when you look at them from the sides. Mastering this will take time, but it’s totally worth it.

To achieve this, you must follow the “up and down” lash directions as well as the “left and right.”
Don’t apply spikes with much pressure and don’t just throw them on. Watch the pressure and ensure you have all spikes on one layer, side by side.
Step 3: Adding messiness / texture
Mapping is easy again; you can just follow the base mapping from the patch.
Add 1 mm longer than base spikes on the top layer lashes that are without extensions. In the outer corner section, add 2 mm longer spikes than the base. This creates a more foxy look.

Apply 2-4D slightly open spikes using CC curl on the top layer and, if needed, on the middle layer as well.
Texturizing spikes should be slightly open at the top (see the picture below). Place them gently on the top or middle layer to achieve the perfect "messiness" we're aiming for.

Texturizing spikes are game changers when you want to make wispy looks more subtle and softer. I call this "giving texture."
You can also use 1-2D volume, depending on the desired effect.
In conclusion: 1-2 mm longer than the base, slightly open 2-4D, CC curl, on the top or middle layer.
After completing these steps, you will have created this beautiful set.

What I like about this mapping style is that it is so customizable and flexible.
Full mapping for wispy cat eye set
Here is the whole mapping in one picture so now you can take a screenshot and start creating this set yourself:

Congratulations!
You’ve reached the end of this article, and I have something very special for you!
My first online course, “Master of Wispy Effects and Russian Volume”, is launching soon, and I’ll be doing a giveaway for this course.
This course contains everything you need to know about creating mappings for each client, achieving competition-level perfect volume, wispy effects, and going into detail about everything.
I will launch it online, and I promise you it will be a game changer for your future. I’ve been working very hard to make it perfect, and it will be ready soon.
So, keep an eye on my Instagram @katlin.liaks to stay updated about the course and the giveaway.
BONUS: Tips for making high-quality content
Here are some tips for making Reels:
1. Choose beautiful models. Look for models with clear skin and good facial features.
2. Use good lighting. Ensure there are no unwanted shadows.
3. High-quality videos. Most modern phones can produce high-quality videos. Just make sure the right settings are turned on and use good lighting.
4. Use props wisely. Fresh flowers, rhinestones, and special colored lighting can enhance your videos. But don’t overdo it – too many props can be distracting.
5. Keep it short. An 8-10 second reel is perfect.
6. Use reel apps. Apps like CapCut have awesome features that can take your reels to the next level.
7. Different angles. Film your work from different angles to make it more personal and interesting. Using macro lenses in some clips can also be cool.
Good luck! I’m really excited to see what masterpieces you will create!
I hope you enjoyed this article and will participate in the giveaway. I’m happy you took the time to learn from me!
If you have any questions, send me a DM, and I’ll be happy to answer you.
See you soon,
Kätlin
